
Wrapping Holiday Food Gifts with Love... and Wrappily

Raise your hand if holiday baking is your jam. Since you put all that love and good stuff into your recipes, make sure your gifts look as deliciously festive as they'll taste. We've compiled a few easy ways to use Wrappily to add a cheery, stylish touch whether it's a classroom gift for school kids, a little something for the neighbors, or a treat for office coworkers.

Wrappily's reversible patterns really shine here. Used with a bit of colorful twine, it totally elevates the presentation of everything from homemade granola to Chex mix to gingerbread men. Here's our round up of holiday gift wrapping inspos.
Happy holiday baking—and most importantly, happy gifting!

1. Box liner & belly band combo:
What's not to love about this coordinated inside and out presentation, a cut-to-size paper box liner inside that echos a matching belly band wrap on the outside. (Extra bonus points if it matches your baked goods, too!)
 Wrappily's reversible patterns provide you a foolproof way to mix and match your paper in this way, or get creative and pair your own.
PRO TIP: use the outside of the box to measure your width, then cut just slightly inside of those lines. Coax your box liner in by using your thumbs to crease along the inside bottom corners for a crisp fit.
Photo: Country Living
2. Jar Belly Band:
The belly band concept works for jars, too. Rather than wrapping the whole thing up, we think a banded wrap is sleeker way to present a gift in a jar. It shows your recipient that this is a homemade gift, not something grabbed off a store shelf. Plus, we really like the way a bit of goodness inside peeks through in the negative space. By all means, get creative by adding some ribbon, gift tags, or a little accent of greenery around the neck. Deck the halls!

PRO TIP: Fold your paper back on itself on one edge so a panel of the reverse pattern shows—an easy way to make the wrapping look a little extra fancy. For trim lines, measure the paper band width to stop just below where the jar begins to taper at the neck.
Ready all your trimmings, for that festive touch
 .
.3. Paper Envelope:
A homemade cookie tucked into the folds of these little paper pouches would be a great gift for classroom, kid's party, bake sale, or the office. Tuck the tallest flap in the back in over the cookie to seal or leave it open like we did so the goodies peek out. Bonus: the kids can help bake (maybe) and fold the envelopes (definitely!)

We used this blog tutorial for folding—don't the reversible patterns look so cute here?

3.5. Paper Envelope 2:
Here's another variation on a paper envelope that utilizes a parchment liner and sticker seal (washi tape would work just fine, too.)

Photo: Good Housekeeping

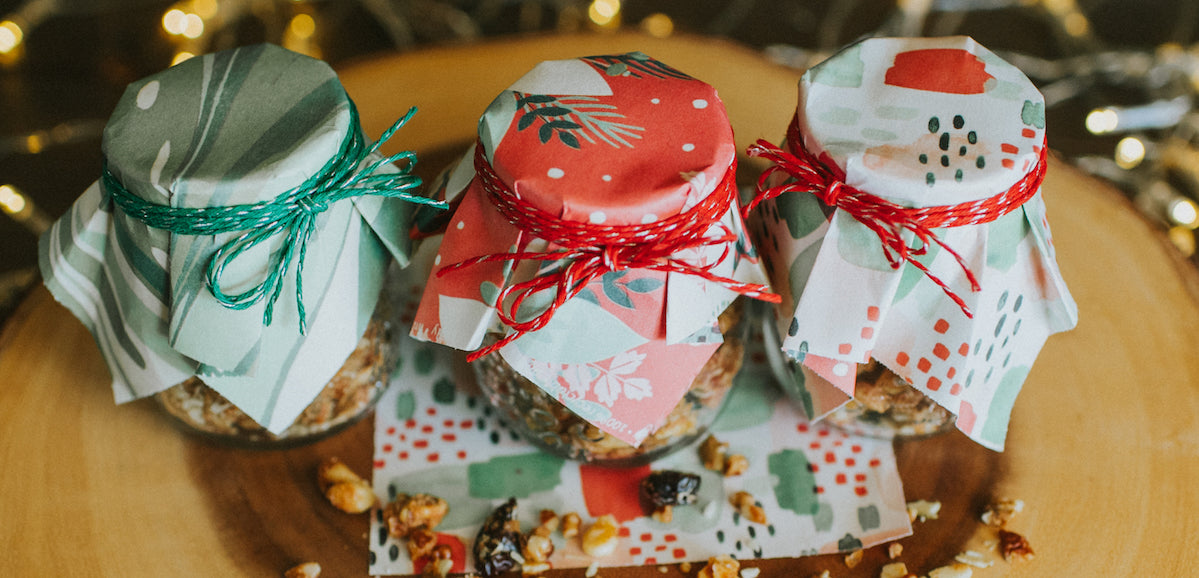
4. Jar toppers:
Just like Grandma's homemade jam jars! Simply cut a square of paper, mold over the lid and tie in place with some twine or ribbon. There's just so much mixing and matching fun to be had here.

5. Wrapping Paper Gift Bag (from flat sheet) :
There's endless variations of this technique on the internet because it's simple and offers a lot of versatility for shop and size depending on what you are wrapping from a sleeve of cookies to loaves of bread. Reinforce the bottom if your item is heavy, and for ideas on get creative with decorating, read on...

Final trick: Add all the trimmings!
No matter how you wrap your delicious goodies from the ideas above, when creating gift groupings we're suckers for a look that's cohesive, yet NOT uniform. Choose a grouping of paper patterns that coordinate, and then layer on ribbons and twines keeping to a similar color palette.
And the finishing touch, a topper! Winter berries and evergreen clippings, cinnamon sticks, pinecones, felt ornaments... gift wrapping is so much fun when you let yourself get creative.
Enjoy!

45 Responses


Leave a comment
Comments will be approved before showing up.
DyogBbFdfrI
November 09, 2020
LqZICXDxoNPjnR