DIY 3D Snowflakes
December 16, 2013

With their whimsical and unlimited designs, snowflakes are the perfect DIY holiday decorating project. Decorate your home this season with beautiful snowflakes using materials you already have on hand. The reversible gift-wrap from Wrappily really make these snowflakes pop!

Gather Materials
Wrappily Gift Wrap (any paper will do)
Scissors
Pencil
Clear Tape
Stapler
Step 1
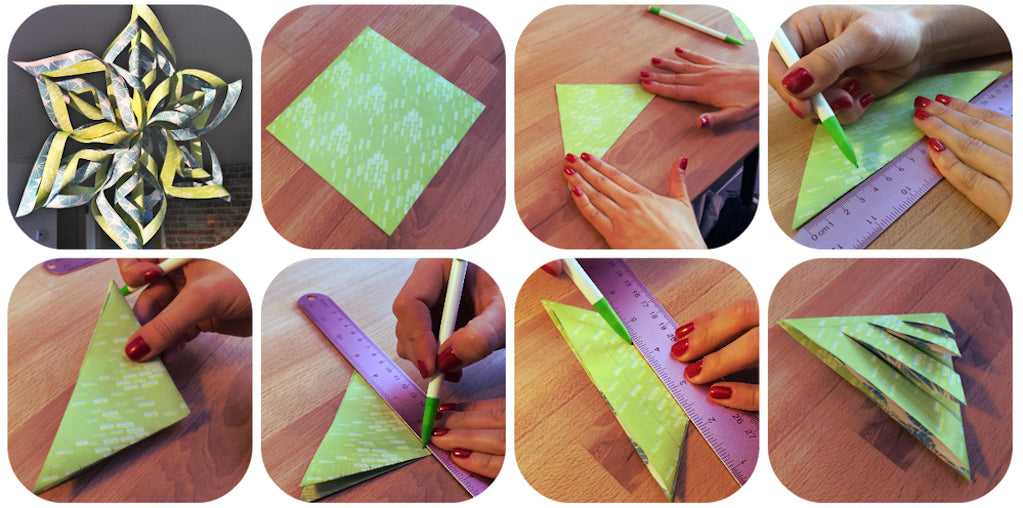
Cut 6 perfect squares (5.5 in pictured). If you’re using copy paper, you can fold the paper into triangles and cut off the excess. Fold the squares into triangles with the folded portion facing you.
Step 2
Using the ruler, make 3 dots one-half of the triangle on the folded edge (2cm apart in the picture). You want a little room on the outer edge and the middle.
Step 3
Fold the triangle into a smaller triangle with the marked edge facing you. On the opposite side of the marked edge, draw a line parallel to that edge (1cm pictured below).
Using the top portion of the triangle as a guide, draw parallel lines between each dot and the measured line.
Step 4
Cut the 3 lines created and completely unfold the triangle. Take the innermost sections and pull together to create a tube. Tape the ends together and flip over the square. Take the next section and tape ends together. Repeat this process until all the sections have been joined.
Step 5
Complete the steps above for the remaining 5 squares. Using 3 of the completed rolls, staple the ends together. Attached the last 3 rolls in the same fashion before stapling the snowflake’s halves together.
Once complete, staple the arms together so the snowflake maintains its shape.
Leave a comment
Comments will be approved before showing up.
© 2025 Wrappily. Powered by Shopify
